LED Matrix Animations can bring creative flair to your projects, making them visually appealing and interactive. When paired with an ESP32, a versatile microcontroller known for its robust performance and wireless capabilities, you can unlock a world of possibilities for dynamic visuals. From simple scrolling text to intricate animated patterns, the combination of an LED matrix and ESP32 caters to hobbyists, educators, and developers alike.
In this article, we’ll explore how to create stunning LED Matrix Animations with ESP32. We’ll walk through the basic setup, programming essentials, and some creative examples to inspire your next project.
Table of Contents
Setting Up Your LED Matrix with ESP32
To get started, you’ll need:
- An ESP32 microcontroller.
- A cascaded 8×8 LED matrix compatible with the MAX7219 driver.
- Connecting wires and a breadboard for prototyping.
- A power source (e.g., USB).
Wiring Instructions
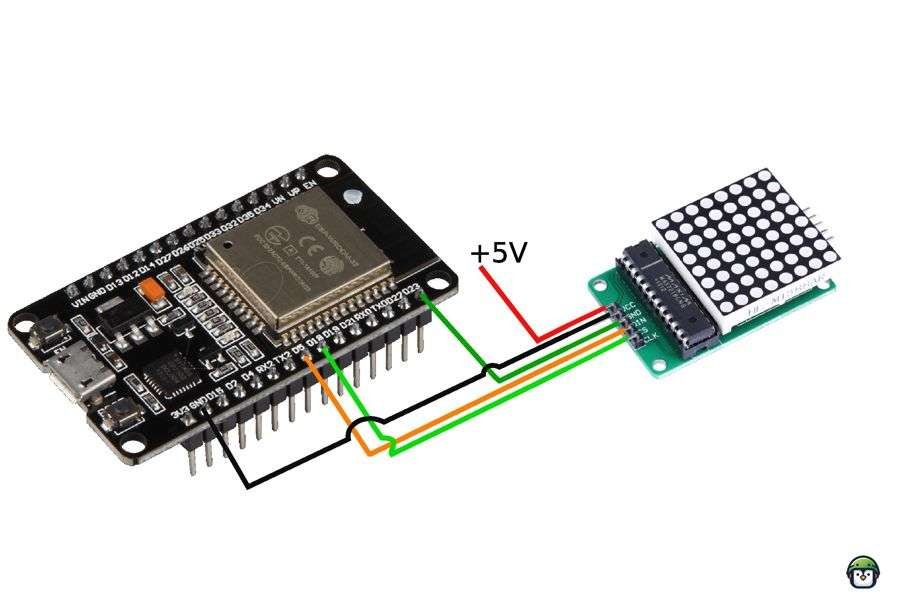
Ensure proper connections between the ESP32 and the LED matrix:
- VCC to 3.3V or 5V: Power the matrix.
- GND to GND: Establish a ground connection.
- DIN to GPIO 23: Data in.
- CS to GPIO 5: Chip select.
- CLK to GPIO 18: Clock signal.
Double-check your connections to prevent damage to your components. Incorrect wiring may lead to issues or even brick your ESP32.
Programming Animations with MicroPython
Using MicroPython simplifies coding for the ESP32. Install the MAX7219 driver library, such as the one by the author (https://github.com/srgalope/micropython-max7219v2024), to control your LED matrix.
Example Code: Scrolling Text
from machine import Pin, SPI
from max7219v2024 import Matrix8x8
import time

# Initialize SPI and LED matrix
spi = SPI(1, baudrate=10000000, polarity=0, phase=0, sck=Pin(18), mosi=Pin(23))
cs = Pin(5, Pin.OUT)
display = Matrix8x8(spi, cs, 4)  # 4 cascaded matrices
display.brightness(5)

def scroll_text(text):
    for i in range(len(text) * 8):
        display.fill(0)
        display.text(text, -i + 32, 0, 1)
        display.show()
        time.sleep(0.1)

scroll_text("Hello World!")
Advanced Animations
Custom Icons and Patterns
You can design custom icons by defining binary patterns for the LED matrix. For example, a simple heart pattern:
HEART = [
    "01100110",
    "11111111",
    "11111111",
    "11111111",
    "01111110",
    "00111100",
    "00011000",
    "00000000",
]

HEART_HOLLOW = [
    "01100110",
    "10011001",
    "10000001",
    "10000001",
    "01000010",
    "00100100",
    "00011000",
    "00000000",
]

HEART_MD_HOLLOW = [
    "00000000",
    "01100110",
    "01011010",
    "01000010",
    "00100100",
    "00011000",
    "00000000",
    "00000000",
]

HEART_SM_HOLLOW = [
    "00000000",
    "00000000",
    "00111100",
    "00111100",
    "00011000",
    "00000000",
    "00000000",
    "00000000",
]
Animating Patterns
Use a sequence of binary patterns to create animations such as a bouncing ball or a waving flag. Define patterns in a list and iterate through them in an unconditional loop with a timed sequence.
from max7219v2024 import Matrix8x8
from machine import Pin, SPI
from  time import sleep_ms
import IconsLibrary

spi = SPI(1, baudrate=10000000, polarity=0, phase=0, sck=Pin(18), mosi=Pin(23))
matrix = Matrix8x8(spi, Pin(5), 1)

matrix.fill(0)  # Clear the display
matrix.brightness(0)

def display_pattern(display, pattern):
    for row_index, row_value in enumerate(pattern):
        for col_index, pixel in enumerate(row_value):
            if pixel == '1':  # If the pixel is on (1)
                display.pixel(col_index, row_index, 1)  # Turn on the pixel
    display.show()  # Update the display to reflect changes


ICONS = [
        IconsLibrary.HEART_SM_HOLLOW,
        IconsLibrary.HEART_MD_HOLLOW,
        IconsLibrary.HEART_HOLLOW,
        ]

pattern_length = len(ICONS)
while True:
    for i,pattern in enumerate(ICONS):
        display_pattern(matrix,pattern)
        matrix.fill(0)
        sleep_ms(100)
Conclusion
Animating an LED matrix with an ESP32 is both fun and rewarding. Whether you’re designing for a personal project or a professional display, the flexibility and power of this combination allow endless creative opportunities. By leveraging the power of MicroPython and open-source libraries, you can bring your ideas to life with ease.
If you’re ready to dive deeper, explore our other articles on LED matrix projects and ESP32 programming. Don’t forget to share your creations with the community!
Leave a Reply