
An IR proximity sensor ESP32 setup offers an efficient way to detect objects, measure distances, and automate tasks in various electronic projects. These sensors operate by emitting infrared light and detecting its reflection from nearby objects, making them indispensable for applications like obstacle detection and touchless automation. Combining the functionality of IR proximity sensors with the powerful ESP32 microcontroller unlocks a myriad of possibilities, from robotics to home automation systems.
In this guide, we’ll explore how to use an IR proximity sensor ESP32 setup. This includes wiring the sensor, programming it with MicroPython, and understanding practical applications. By the end of this tutorial, you’ll have the knowledge to integrate this technology into your own innovative projects.
Table of Contents
What is an IR Proximity Sensor?


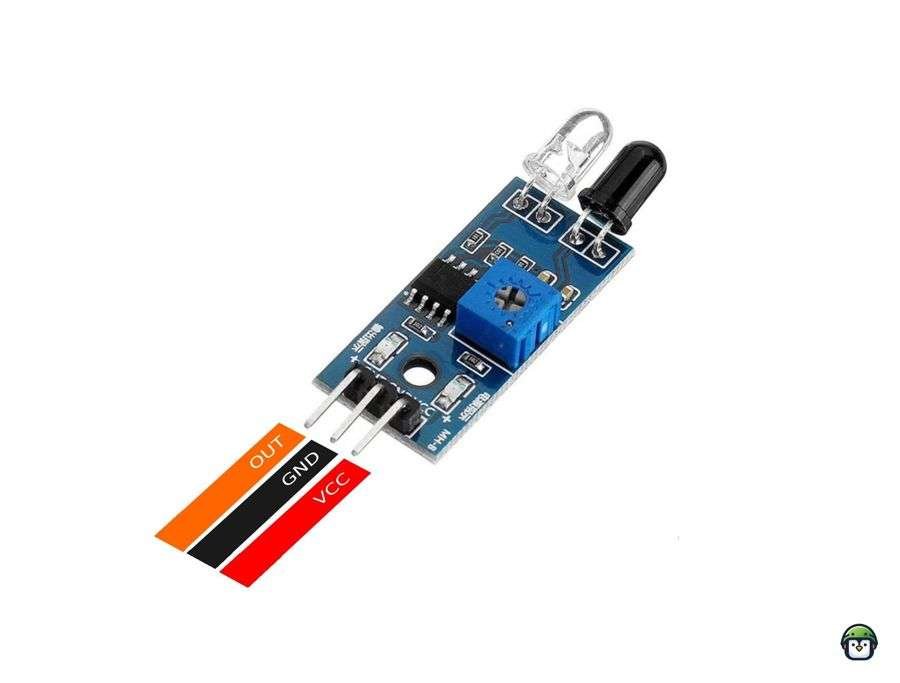
An IR proximity sensor detects objects by emitting infrared light and measuring the reflected signal. These sensors consist of an IR LED (emitter) and a photodiode or phototransistor (receiver). When an object is nearby, it reflects the emitted IR light, which the receiver detects. Based on the intensity of the reflected light, the sensor can determine the presence and, in some cases, the distance of the object.
Related:
Types of IR Sensors:
- Active vs. Passive: Active sensors emit IR light, while passive sensors detect ambient IR radiation.
- Reflective vs. Through-beam: Reflective sensors measure the reflection of light from objects, while through-beam sensors use a separate emitter and receiver to detect objects blocking the IR beam.
Applications include obstacle detection in robotics, line-following vehicles, and touchless automation systems.
Components Needed
To get started, you will need:
- ESP32 Development Board
- IR Proximity Sensor Module
- Jumper wires
- Breadboard
- Optional: LED for output visualization
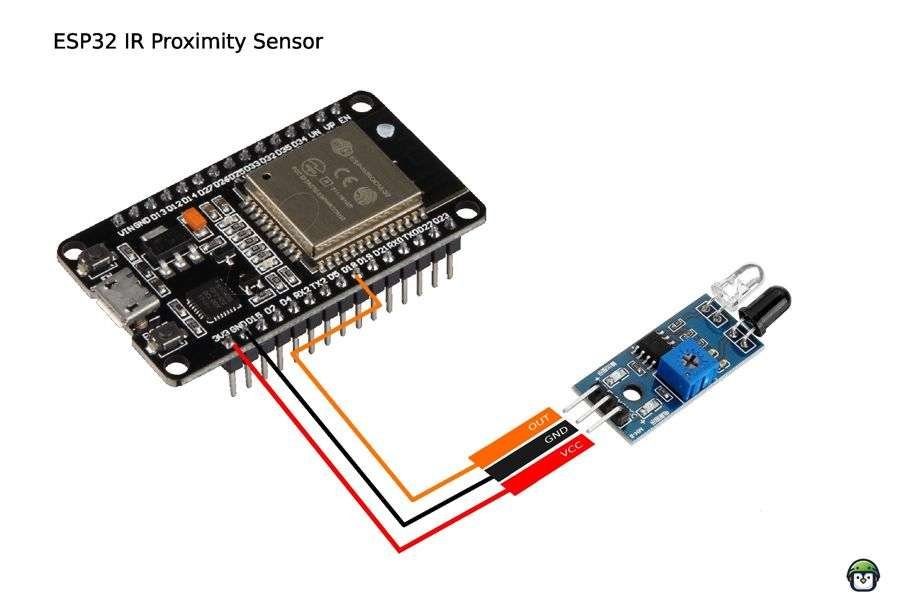
Wiring the IR Proximity Sensor with ESP32


Connecting the IR proximity sensor to the ESP32 is straightforward. Here is the wiring guide:
- VCC: Connect to the 3.3V or 5V pin on the ESP32 (check your sensor’s voltage requirements).
- GND: Connect to the GND pin on the ESP32.
- OUT (Signal pin): Connect to a GPIO pin on the ESP32 (e.g., GPIO 18).
Programming the ESP32 with MicroPython
We will use MicroPython to program the IR proximity sensor ESP32 setup. If you haven’t set up MicroPython on your ESP32, follow a guide to install the firmware and use the Thonny IDE.
MicroPython Code Example
from machine import Pin
from time import sleep

# Initialize the sensor pin
ir_sensor = Pin(23, Pin.IN)

while True:
    if ir_sensor.value() == 0:
        print("Object detected!")
    else:
        print("No object detected.")
    sleep(0.5)
This script reads the sensor’s digital output and prints whether an object is detected. The Pin.IN configuration ensures the GPIO pin can read input signals from the sensor.
Testing and Calibration
- Testing: Upload the code to your ESP32 and open the serial monitor to view the sensor’s output. Place an object near the sensor and observe the changes.
- Calibration: Adjust the sensor’s potentiometer (if available) to fine-tune its detection range and sensitivity.
Applications of IR Proximity Sensors with ESP32
Integrating an IR proximity sensor ESP32 setup enables a wide range of applications:
- Obstacle Avoidance in Robotics: Detect and avoid obstacles for autonomous navigation.
- Line-following Vehicles: Use the sensor to track lines on the ground.
- Touchless Automation: Create systems for automatic lighting, hand sanitizers, or door openers.
- Interactive Installations: Build responsive art or gaming setups.
Conclusion
An IR proximity sensor ESP32 setup is a practical and versatile solution for object detection and automation tasks. The sensor’s ability to detect objects using infrared technology, combined with the ESP32’s powerful features, makes it ideal for robotics, smart home projects, and more. With simple wiring and programming, you can bring your creative ideas to life using this setup.
Experimenting with an IR proximity sensor ESP32 is an excellent way to enhance your understanding of sensors and microcontroller systems. Whether you’re building a line-following robot or automating household tasks, this tutorial provides the foundation to get started.


